Introduction
Gamemodes
Squad has several gamemodes that each operate differently. Although, all gamemodes are defineable by a shared mechanic: Tickets. Tickets are the backbone of every team's success in a Squad match.
Each team starts with a preset amount of Tickets, usually in the hundereds. On the Random Advance and Secure Gamemode, as well as Advance and Secure, both teams start with the same amount of Tickets, but this can differ in other gamemodes.
Tickets are used up when any of the following happens:
- A player gives up while incapacitated, depleting one ticket1
- A player is incapacitated and bleeds out, depleting one ticket1
- A player takes enough damage immediately after being revived from incapacitation, which would otherwise send them to the incapacitated state, depleting one ticket1
- A player takes enough damage that they skip the incapacitated state and is immediately killed, depleting one ticket1
- Any of the aforementioned happening to a team Commander depletes two Tickets instead of one.
- A vehicle is destroyed, depleting one or multiple tickets depending on the vehicle.
- A radio is dug down by the enemy and bleeds out.2
- On Random Advance and Secure or Advance and Secure, when a teams first Objective is captured by the enemy team, the defending team is put on a Mercy Bleed where the defending team loses 60 tickets per minute (1 ticket per second) for as long as that objective is held by the enemy for.
- On Advance and Secure, capturing more points over the enemy will put their team onto a Ticket Bleed.
- On Invasion, when the Attacking Team captures the Defender's Final Objective, the Defenders ticket count is immediately depleted to zero.
- On Territory Control, when the enemy team holds more Territories (or Hexes), they put the other team on a Ticket Bleed.
Player deaths caused by team kills do not deplete tickets.
Radios can be saved by the team who placed them by either digging them down or up. Friendly Radios can be dug down and scuttled while bleeding out without depleting your tickets, and do not need to be dug up and out of the bleeding state first.
On Advance and Secure and Random Advance and Secure, When a team reaches 0 tickets, the opposing team wins the match. Matches can be a stalemate if both teams have the same amount of tickets and the Match Timer depletes. If the Match Timer depletes and both teams do not have the same ticket count, the team with more tickets wins.
On Invasion, the Defending team wins if the match timer depletes before the Attackers capture all objectives. The Defenders can also lose by their tickets being depleted from other sources of ticket depletion.
Maps often have multiple Layers for each gamemode, which changes the layout of capture points and some other factors.
Random Advance and Secure (RAAS)
Random Advance and Secure is the most common gamemode in Squad. In this gamemode, both teams start at their respective parts of the map at their uncapturable Main Objective, and must capture the first neutral objective to reveal the next objective, and so on.
Most maps have seven objectives total, but some smaller ones have five. Objectives can be predicted on some layers by the direction the known objectives have taken, this is usually referred to as a Lane. Some Lanes are very predictable on some Layers, and others have lanes which wildly vary.
The objectives until the ones close to the center of the map are usually called Backcaps, and the act of capturing them toward the center of the map is called *Back-capping.
Some Layers are characterized by one team having quite unpredictable objectives, and the other team only having to capture one objective before knowing where the rest of the objectives are. Additionally, some layers have Guaranteed Objectives which are predictable to both teams. You may have to expect these objectives to be rushed by the enemy for them to ambush and saboage you, and you should play cautiously and anticipate this. Never assume a Backcap is safe.
Objectives are only revealed if you capture the objective before it. If your team captures an objective and reveals the next, and then loses the same objective, the revealed objective will still remain visible. You can only capture an enemy objective if you have captured the one preceeding it.
When a point is initially captured from neutral at the start of the game, the team gains 20 tickets for initial objective captures. Capturing points held by the enemy gains the attacing team 60 tickets. This means capturing a midcap (the point in the center of the map) isn't of exceptional importance, as the initial capture only gains 20 tickets over the enemy. Points which are neutralized by the enemy and then recaptured by your team do not gain the team the 20 ticket initial cap bonus, the team will only gain tickets if the enemy fully captures that point and the defending team fully captures it back.
Double Neutral
In the scenario of two objectives, one held by the friendly team, and the other held by an enemy, if both teams attack the enemy team's objectives at the same time, they can neutralize both objectives. This means both teams are unable to capture the next enemy objectives after, and the neutralized objectives will become stuckk in this state until either team recapture their own defense objective. In this scenario, it does not matter how many enemies are on the friendly neutralized objective, as long as three players of either team are inside the capture zone of their objective, they can recapture it and then threaten the objective they had neutralized. This means a top priority for a team which is in a double neutral situation is to recapture their neutralized objective with at least 3 people, otherwise the enemy can recapture theirs and then threaten the objective.
Fog of War
Some Severs may disable the Fog of War feature, which means all capture points will be known to both teams immediately. This replicates the gameplay of Advance and Secure, while keeping the objective variance of Random Advance and Secure.
Advance and Secure (AAS)
Advance and Secure is identical to Random Advance and Secure, apart from the fact that all objectives are the same every match, and are revealed from the start. This makes the gamemode a lot more prone to Rushing Backcaps, where one team rushes the early caps of the other as they are already revealed.
Invasion
Invasion is like Random Advance and Secure, but instead of both teams being equal in their ability to capture objectives, there is a Defending and Attacking team.
The Attackers start with far less tickets than the Defenders, but can gain more tickets by capturing the Defender's objectives. Once a Defenders objective has been captured, the Defenders can no longer recapture that objective, and the next defense objective is revealed for the attackers. Attackers can win the match by either capturing the Defender's last point, depleting their tickets to zero, or by depleting the Defending team's tickets to zero via other means. The Defenders start with 800 or 1000 tickekts, and can see all of their objectives from the start of the game. The Defending team wins by depleting the Attacker's tickets to zero, or allowing the match timer to deplete before the Attackers are able to capture the Defending team's final objective.
Fog of War
Some Severs may disable the Fog of War feature, which means all capture points will be known to the attacking team immediately.
Spawning
There are several spawns used to get to the battlefield. Note that spawning itself does not cost a ticket.
Spawning anywhere other than the Main Base will not resupply your ammo. Use nearby available ammo sources, such as ammo boxes or vehicles, to resupply your ammunition.
Try not to switch kit before spawning in when spawning somewhere other than Main Base, this will spawn you with very little ammo and force you to resupply more, costing more ammo from your team. This can sometimes be a necessity if a FOB you are spawning at doesn't have enough ammo to switch to a role off in person, but does have enough ammo to resupply something essential (such as a rocket for an anti-tank launcher) if you are to switch kit before spawning. If you aren't sure what to spawn in as, what to switch to, or what to play as, inform your Squad Leader of this and ask them.
Main Base
The Main Objective has a spawn on it accessible to the team at all times. It can always be spawned on by anyone in the entire team, is invulnerable to the enemy team's attack, and Servers can often impose additional rules to keep the main objective protected.
Spawn Bunkers
Spawn Bunkers (HABs) are structures built on Forward Operating Bases (FOBs) which the entire team can spawn on. Players can spawn on these structures as long as 45 seconds have passed since the time that they were downed or fully killed (not bled out). Spawn Bunkers can be overran (proxied) by the enemy team by storming a radius around it with their own team's infantry. It takes anywhere from the minimum of 2 players within 20 meters, to 8 players within 80 meters to overrun a Spawn Bunker. Spawn Bunkers can also be disabled if the Radio that enables it to be built is damaged.
Rally Points
Rally Points are carried and placed by Squad Leaders, and can only be spawned on by players in their Squad. Unlike other means of spawning, the Rally Point has a 60 second timer synchronized for every player in the Squad and operates as a "Spawn Wave". If you were incapacitated within 20 sceonds of the Rally Point's timer, that remaining time left is added on to the Rally Point's timer for you, and you must wait the 60 seconds plus that additional time to spawn. For example, if you are incapcitated while the Rally has 5 seconds left, you will miss that wave, and must wait 65 seconds (60 plus 5 seconds) to spawn on that Rally's next spawn wave.
Buddy Rallies:
On the Insurgent Faction, a Squad Leader can deploy a Rally Point remotely on any Rally Point placed by another Squad by right clicking on the Rally Point on the map and clicking Deploy Buddy Rally. Be warned that this will reset the timer on the rally for the other Squad, though.
Mobile Spawn Vehicle
The Western Private Military Contractors (WPMC) Faction has a vehicle available to them on some layers called the Mobile Spawn Vehicle (MSV), this operates essentially as a FOB's Spawn Bunker when it is stationary and has it's engine turned off, but costs 20 tickets when destroyed, makking it the most ticket-valuable asset in the whole game.
Where should you spawn?
For the most part, Spawn closest to your Squad or the Squad leader. If you aren't sure where to spawn, ask your Squad Leader. Note that it is often better to wait for a Spawn to be placed such as via a HAB, Rally, Buddy Rally or MSV, than it is to spawn somewhere irrelevant or at the main base.
"Hold Spawns"
You may hear your Squad Leader ask you to Hold Spawns, this means to not Spawn, and usually is done to wait for a better spawn to become available. If you aren't sure what the plan is, ask your Squad Leader.
Tactics
Leap Frogging
Leap Frogging in a R/AAS sense is when two Squads or groups of players leap-frog between points to capture them. For example: An Attacking Squad captures the next objective, those Attacers become that Objective's Defenders, while the previous Defending Squad becomes the next Objective's Attackers. This leaves Objectives defended at all times, and preserves unit cohesion.
Screening
When defending an Objective, it is often good to spread out along the edges of objective to act as an early warning for enemy attacks, even if it is somewhat far away from the expected axis of push. This can be essential to ensuring an objective isn't overran by a witful enemy, and makes sure you aren't caught off guard. This is a several-person job, and can't be completely fulfilled by one person; a forest surrounding an Objective will need more people screening more directions than an objective surrounded by a desert, which can often be sufficiently screened by two or three people.
Even if you're the only person screening, it can often be enough. Think about where enemies may place FOBs to push from, such as a nearby farmstead, patch of forest, or other strategic location, and lie in ambush to provide early warning to your team, and offer some resistance. Despite this, don't push too far away from your Squad and inform them of your intentions. If you are too far away and the enemy attacks your defenses from a different, unexpected direction, you may be too far to offer any meaningful resistance before it's too late.
Screening is one of the most powerful and underlooked defensive tactics in Squad, and is a great way for an unexperienced enemy to find themselves bewildered and confused by your presence in an area they thought to be safe.
An example of Screening, courtesy of squadcalc.app
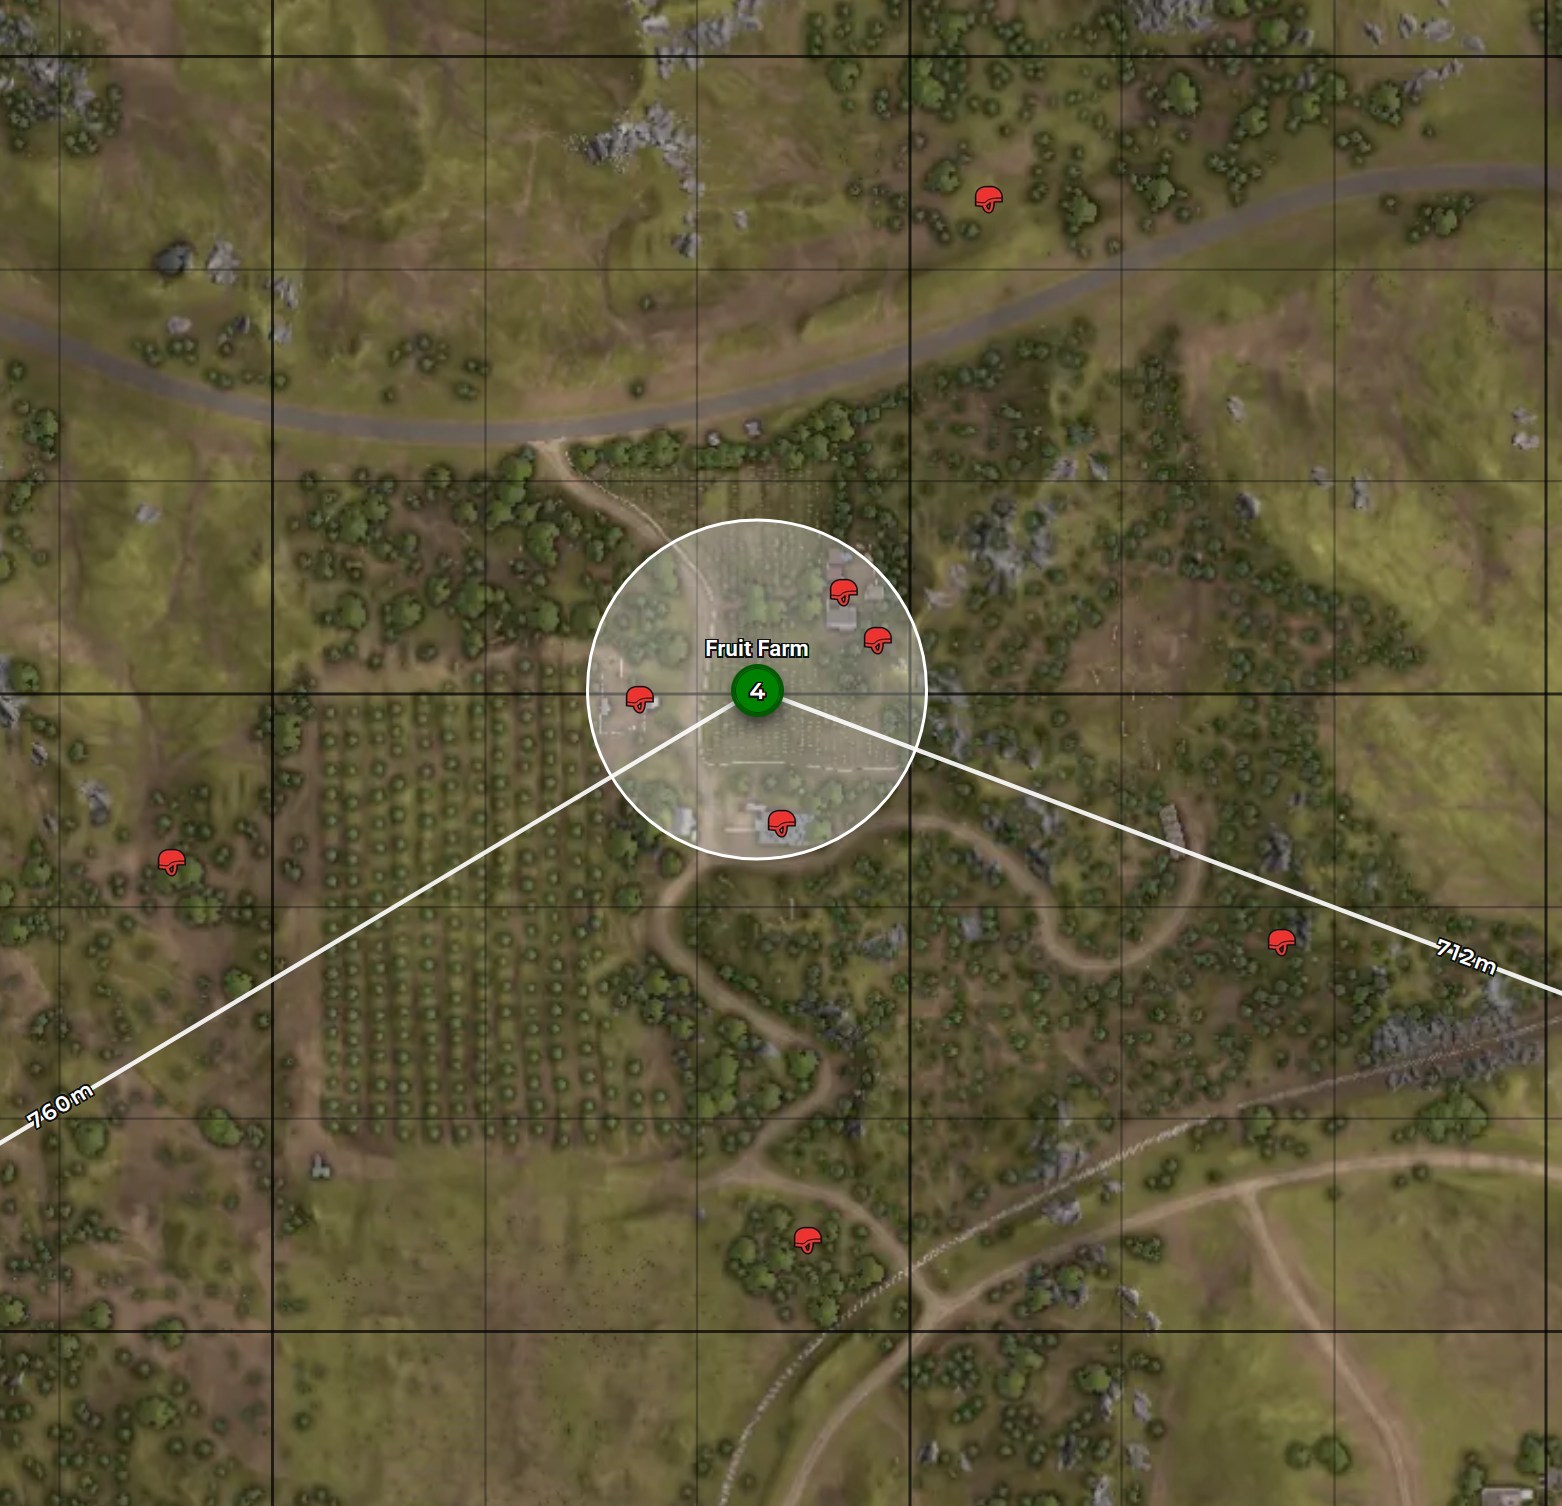
Screening can catch enemy Squads on the move, lone wolfing infantry harassing your FOB, and enemy Squads in the back of logis trying to place Radios. In the case of the later, it might be optimal to wait for the enemy to place the radio before attacking and revealing yourself, this can often result in Squad Wipes that resrult in an undefended enemy Radio that you and your team can dig down to deplete the enemy of a prescious 20 tickets.
The job of a Screen isn't to provide enough resistance, it's to provide provide early warning, and potentially enough resistance for the rest of your Squad and other players to move over.